INTRO
Ciao I’m The Cuz and this is The Cuz Does, the unconventional DIY blog. For those who are new to my blog, I’m building from scratch my Workshop, My DEN, and in this post, I will share with you, my drill press stand idea. Every workshop needs a drill press to make precise holes, so I started to research through the internet for some ideas. I would like to build a drill press stand where I can keep all my bits, and that has a tabletop that can expand itself so I can drill holes in long lumbers or long steel bars.
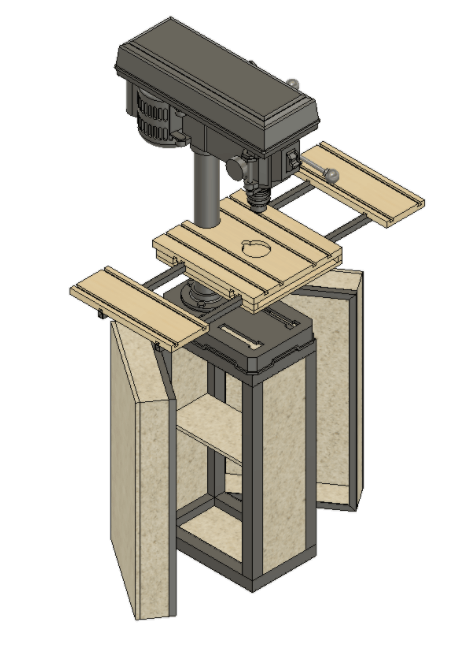
I ended up with something like this:
Before downloading the designs I have attached to this article, there are some considerations to keep in mind:
- I have a standard table drill press, so, if you can refer to the cart design for the overall dimension, you need to figure out where to place the beam where you will screw your drill press at, and weld it to the chart (that’s why I haven’t designed it)
- The way to fix the tabletop to your drill press stand depends on how your own machine is made so it can easily be different from mine.
Here you can download all the designs and the .stl files for the 3D printed parts I used.
BILL OF MATERIALS
For this project I used some leftover materials from other projects:
- 1 square steel bar 40x40x6000 millimeters (cart structure).
- 1 square steel bar 20x20x1500 millimeters.
- 1 12 mm thick OSB sheet (drawers).
- 1 22 mm thick scrap ply (worktop).
- 2 20 mm thick scrap lumber.
- 1 12 mm thick scrap ply (worktop base).
- 4 wheels
- v-groove 3d printed parts
LIST OF TOOLS USED
All the tools I used to build my drill press station
- Welding machine.
- Table Saw.
- Router.
- CMT 818.142.11 Dovetail bit.
- Aluminum extrusion M5 nut.
STRUCTURE
To build my drill press stand I started cutting the steel needed for the structures. Then I welded all the parts, being sure that everything was squared. After this, I placed the beam used to connect the drill press and the cart in the right spot and I welded it too. I’ve traced on a masking tape piece the holes at the base of the drill place and then I’ve placed the masking tape on the connection beam I drilled the 2 holes needed making them slightly bigger so I can finely adjust the drill press position.
I completed the structure by painting everything.
TABLETOP
I started by cutting a 22 mm thick and 1-meter long birch ply at 400 mm. then I cut this piece into 2 150mm long pieces and 1 350 mm long piece. With the CMT 818.142.11 9/16-Inch dovetail bit I routered 4 grooves in the 3 wood ply.
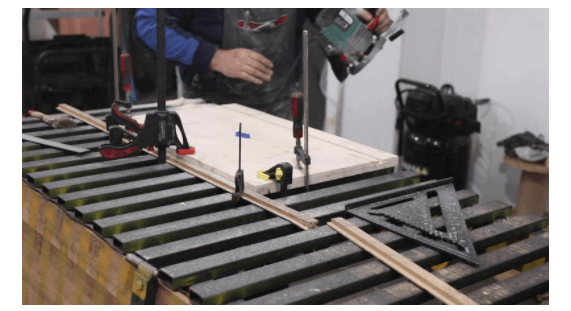
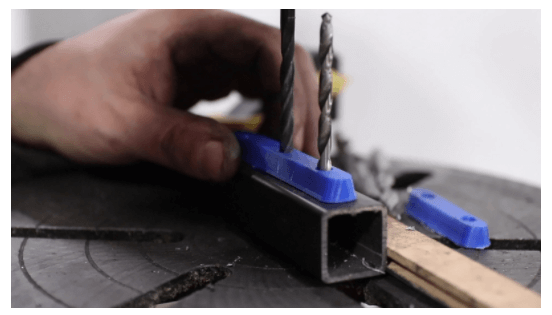
I cut the 20×201500 steel bar into 4 350mm long pieces. Then I drilled 5 holes in each piece to screw the 2 3d printed dovetail parts. The shorter one needed to be screwed tight to the end part of the steel bar, the longer one, needed to be placed at the beginning of the steel bar and it needed to be not very tight so it can easily scroll in the groove of the ply.
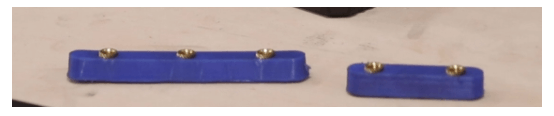
To drill the 5 holes I used the 3d printed dovetail parts as reference.
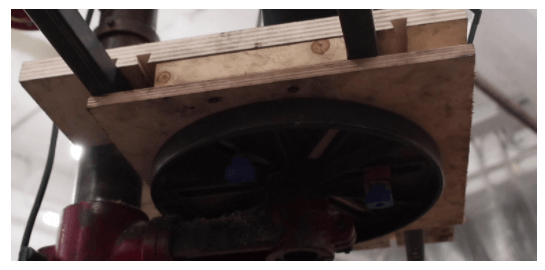
I had a scrap piece of a ply of the right dimension to be placed on my drill press original table. I cut 2 20mm high lumber at the table saw and I attached the lumber to the ply.
I marked where to attach the ply to the drill press from the back of the drill press’ original metal plate and made 3 holes. I used a Forstner bit to place flush with the ply 3 M5 wood nuts and I screwed 3 M5 bolts from the bottom of my drill press original plate to fix everything together. I screwed this ply and the tabletop I built before.
I then built a fence of aluminum extrusion making 2 holes and using an m5 rod bar and 2 of the M5 nut groove slide I 3d printed.
I can block this fence by tightening it up by using 3d printed M5 nut knobs.
CONCLUSIONS
Now I have a complete drill press station where I can drill holes on long materials, where I can store all my bits, and that allows me to make repetitive holes thanks to the hardware I can attach to the aluminum extrusion I used as a fence.
#whatdoyousuggest
what you would have done differently? please let me know in the comment section below. I will consider any corrections or upgrading proposals and reply to all the comments I can.
If you want to navigate through my other projects you can give a look at my project page
Ciao from TheCuz!